
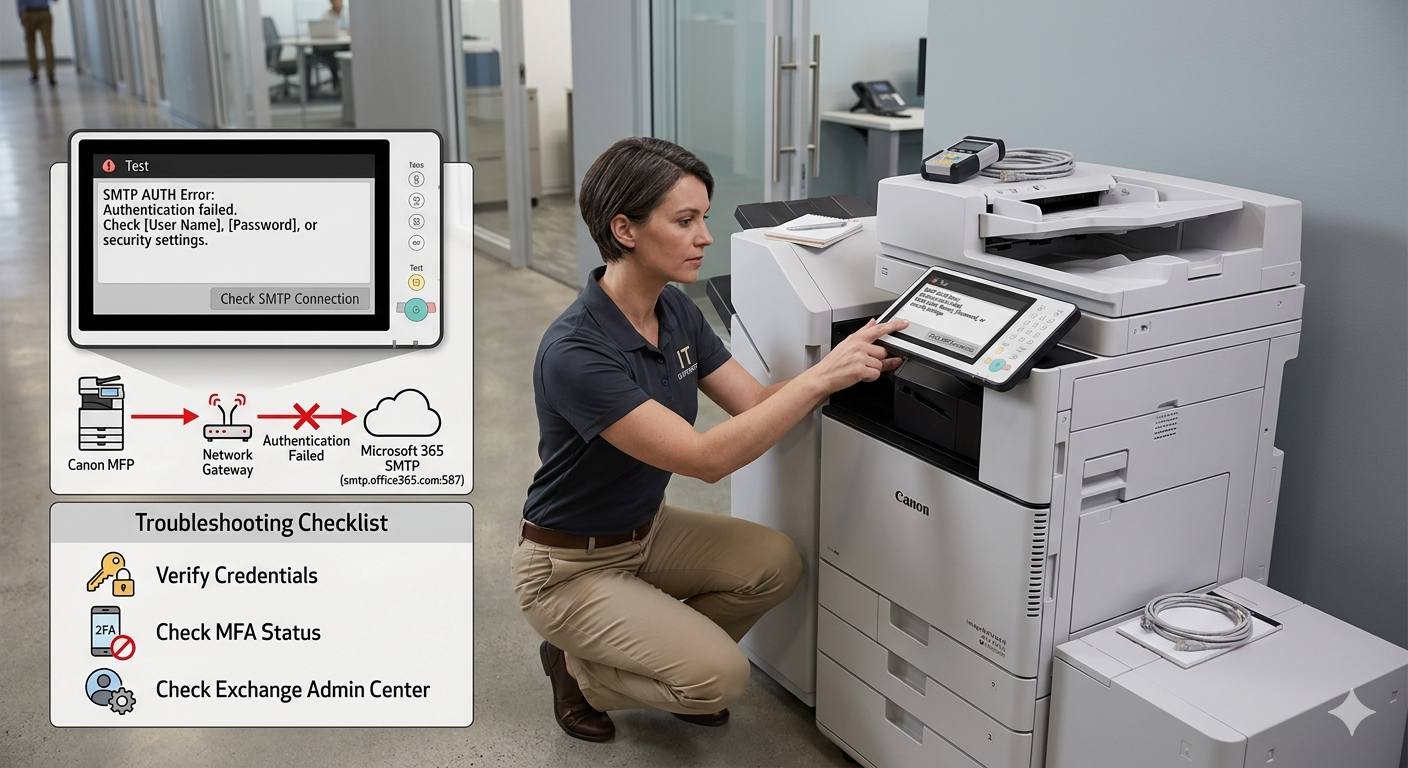
It is one of the most frustrating moments in office administration: you place a crucial document on your Canon imageRUNNER ADVANCE, press “Scan and Send,” and moments later, the device chirps a warning, or a “TX Job Log” prints out bearing the dreaded “Error” result. You’ve confirmed the destination email is correct. You’ve restarted the machine. Yet, the document refuses to leave the scanner.
If you are using Microsoft 365 (formerly Office 365) as your email provider, you are not alone. This is an incredibly common scenario, and it rarely means your Canon hardware is broken. Instead, it almost always points to a security mismatch between the aging authentication methods used by most printing hardware and the modern, fortified defenses of Microsoft’s cloud environment.
This guide will explain why this failure happens and provide two clear, functional paths to resolve it.
The Core Problem: Modern vs. Legacy Security
Historically, devices like scanners sent email using a protocol called SMTP AUTH (Authenticated Simple Mail Transfer Protocol). The device simply connected to the mail server, presented a clear-text username and password, and asked the server to relay the message.
Microsoft is in the process of deprecating this “Basic Authentication” method across its entire tenant ecosystem. Microsoft 365 now mandates Modern Authentication (OAuth2), which uses secure tokens rather than passwords.
Most Canon Multifunction Printers (MFPs) manufactured before 2022 do not natively support OAuth2 for SMTP sending without specific firmware upgrades. When your Canon device tries to send a password to smtp.office365.com, Microsoft rejects it as an unsecure login attempt, resulting in an “Authentication Error” or a generic “TCP/IP Error” (often Error 801, 802, or 752 on Canon devices).
Preparation: Diagnostics and Device Access
Before changing any settings, you must access the Canon device’s web interface, known as the Remote UI (RUI).
- Find the IP Address: On the physical copier, press the
Counter Checkor(123)button. The IP address is usually displayed on the top left or under the ‘Network’ tab. - Access the RUI: Open a web browser on a computer connected to the same network and type the IP address into the address bar (e.g.,
192.168.1.50). - Log In: You must log in as an Administrator. The default credentials are often
Administrator/7654321orAdmin/blank.
Solution Path 1: The ‘Authenticated SMTP’ Method (Easiest, Licensed)
This is the most common approach. The copier will “log in” as a dedicated licensed Microsoft 365 user account (e.g., scanner@yourdomain.com).
Step 1: Microsoft 365 Admin Center Configuration
You must explicitly permit this single mailbox to use the deprecated legacy authentication protocol.
- Log into the Microsoft 365 Admin Center.
- Go to Users > Active users.
- Select the user account the scanner will use (e.g.,
scanner). - In the flyout menu, click the Mail tab.
- Under Email apps, click Manage email apps.
- Crucial Step: Check the box for Authenticated SMTP.
- Click Save changes.
Step 2: Canon Remote UI Configuration
Navigate to the SMTP settings page. The exact path varies slightly by model, but is generally: Settings/Registration > Function Settings > Send > Network Settings > E-mail/I-Fax Settings.
Enter the following precisely:
| Setting | Value | Note |
|---|---|---|
| SMTP Server Address | smtp.office365.com | Do not use outlook.office365.com. |
| E-mail Address | scanner@yourdomain.com | This must be the full email address. |
| POP RX/SMTP TX Port | 587 | Standard port for STARTTLS. |
| Allow TLS (SMTP TX) | Enabled (Check) | |
| Use SMTP Authentication (SMTP AUTH) | Enabled (Check) | |
| User Name | scanner@yourdomain.com | Must match the ‘From’ email above. |
| Password | The account password | See Troubleshooting below for MFA. |
Click OK or Save. Many Canon models feature a Check SMTP Connection button at the top of this screen. Press it. If it reports “Connected,” your issue is resolved.
Solution Path 2: The ‘IP Relay’ Method (Most Secure, Unlicensed)
If you have many devices, don’t want to pay for a dedicated license, or if Solution 1 still fails due to complex tenant security policies, you should use an IP-based Relay. This trusts your office’s public, static IP address.
Requirements
- A Static Public IP Address for your office network. (If your office internet IP changes frequently, this method will break).
- Your external DNS SPF record must be updated to include Microsoft 365.
Step 1: Microsoft 365 Exchange Admin Configuration
We will tell Microsoft Exchange to accept anonymous mail arriving specifically from your office’s unique IP signature.
- Log into the Exchange Admin Center.
- Go to Mail flow > Connectors.
- Click + Add a connector.
- Connection from:
Your organization's email server. - Connection to:
Office 365. Click Next. - Give it a name (e.g.,
Office Copier Relay) and ensure “Turn it on” is checked. Next. - Choose:
By verifying that the IP address of the sending server matches one of these IP addresses... - Click the + and enter your office’s Static Public IP Address. Click Save, then Next.
- Click Create connector.
Step 2: Determine your MX Endpoint
- In the M365 Admin Center, go to Settings > Domains.
- Click on your domain (e.g.,
yourdomain.com). - Click the DNS records tab.
- Find the MX record. Copy the value under Points to address (e.g.,
yourdomain-com.mail.protection.outlook.com). This is your new SMTP server.
Step 3: Canon Remote UI Configuration
Navigate back to the Canon E-mail/I-Fax Settings. We will disable authentication and use Port 25.
| Setting | Value |
|---|---|
| SMTP Server Address | yourdomain-com.mail.protection.outlook.com |
| E-mail Address | anything@yourdomain.com |
| POP RX/SMTP TX Port | 25 |
| Allow TLS (SMTP TX) | Enabled (Recommended) |
| Use SMTP Authentication (SMTP AUTH) | Disabled (Uncheck) |
| User Name/Password | Leave blank/Delete |
Click OK/Save. Test the connection.
Top Troubleshooting Failures
If you are using Solution Path 1 (Authenticated SMTP) and it still fails, check these three items:
1. Multi-Factor Authentication (MFA) is Active
If the scanner account has MFA enabled, you cannot use the regular account password on the copier. The copier cannot provide the second factor (like a text code).
- Fix: You must generate an App Password. In the user’s Microsoft security settings (My Account > Security Info), create a new App Password. Use this unique 16-character string in the Canon’s password field.
2. Security Defaults are Enabled
If your Microsoft 365 tenant is newer, it likely has “Security Defaults” active. This forces MFA tenant-wide and implicitly blocks all legacy authentication, including SMTP AUTH, overriding your per-mailbox setting.
- Fix: You must disable Security Defaults in the Microsoft Entra ID (Azure AD) properties and replace them with Conditional Access policies, which allow you to create explicit exceptions for your copier’s service account while keeping MFA mandatory for everyone else.
3. ‘From’ Address Mismatch
Some modern mail servers strictly enforce that the User Name used to authenticate (e.g., scanner@) must match the default E-mail Address (the ‘From’ line) set on the device. If the copier authenticates as scanner@ but tries to send a document that looks like it came from ceo@yourdomain.com, Microsoft will reject it as a spoofing attempt.
By systemically following these verification steps, you can bridge the gap between your Canon hardware and Microsoft 365 security, ensuring reliable scan-to-email function.
Also Read: Troubleshooting Guide: Fixing Microsoft Outlook 365 SMTP Server Issues
Source: Solved: Send from Email failing with Exchange 365 – Canon Community